note
- nginx的一个配置互动。
一、安装
安装nginx跟网上来就好,很简单,默认80端口。
配置文件都在安装路径类似于 /usr/local/nginx/conf/
一般我们常编辑 vim /usr/local/nginx/conf/nginx.conf # 这就是nginx默认使用的配置文件, 可以看到其listen的端口号是80(因为防火墙一般是访问不了的)
开放端口:(开放端口后要关闭nginx,再启动(推荐),或是直接重新加载)
- 查看开放的端口号:
firewall-cmd --list-all- 添加新的端口:
firewall-cmd --add-port=8090/tcp --permanent- 删除端口:
firewall-cmd --remove-port=8090/tcp --permanent- 重启防火墙:
firewall-cmd --reload- 查看防火墙状态:
systemctl status firewalld# 后面多了一个d,linux很多服务都是这样,视频里还有句这个
firewall-cmd --add-service=http --permanent,但是没有使用还有这种
firewall-cmd --permanent --add-service=https这俩应该都是永久添加http和https服务访问吧
nginx常用命令:
首先要进到安装目录里:
cd /usr/local/nginx/sbin# 可能是其它路径启动:
./nginx关闭:
./nginx -s stop重新加载:
./nginx -s reload
二、配置文件详解
vim /usr/local/nginx/conf/nginx.conf
可参考这里,有一个比较全的讲解。
nginx.conf
#user  nobody;
worker_processes  1;

#error_log  logs/error.log;
#error_log  logs/error.log  notice;
#error_log  logs/error.log  info;

#pid        logs/nginx.pid;


events {
    worker_connections  1024;
}


http {
    include       mime.types;
    default_type  application/octet-stream;

    #log_format  main  '$remote_addr - $remote_user [$time_local] "$request" '
    #                  '$status $body_bytes_sent "$http_referer" '
    #                  '"$http_user_agent" "$http_x_forwarded_for"';

    #access_log  logs/access.log  main;

    sendfile        on;
    #tcp_nopush     on;

    #keepalive_timeout  0;
    keepalive_timeout  65;

    #gzip  on;

    server {
        listen       80;
        server_name  localhost;

        #charset koi8-r;

        #access_log  logs/host.access.log  main;

        location / {
            root   html;
            index  index.html index.htm;
        }

        #error_page  404              /404.html;

        # redirect server error pages to the static page /50x.html
        #
        error_page   500 502 503 504  /50x.html;
        location = /50x.html {
            root   html;
        }

        # proxy the PHP scripts to Apache listening on 127.0.0.1:80
        #
        #location ~ \.php$ {
        #    proxy_pass   http://127.0.0.1;
        #}

        # pass the PHP scripts to FastCGI server listening on 127.0.0.1:9000
        #
        #location ~ \.php$ {
        #    root           html;
        #    fastcgi_pass   127.0.0.1:9000;
        #    fastcgi_index  index.php;
        #    fastcgi_param  SCRIPT_FILENAME  /scripts$fastcgi_script_name;
        #    include        fastcgi_params;
        #}

        # deny access to .htaccess files, if Apache's document root
        # concurs with nginx's one
        #
        #location ~ /\.ht {
        #    deny  all;
        #}
    }


    # another virtual host using mix of IP-, name-, and port-based configuration
    #
    #server {
    #    listen       8000;
    #    listen       somename:8080;
    #    server_name  somename  alias  another.alias;

    #    location / {
    #        root   html;
    #        index  index.html index.htm;
    #    }
    #}


    # HTTPS server
    #
    #server {
    #    listen       443 ssl;
    #    server_name  localhost;

    #    ssl_certificate      cert.pem;
    #    ssl_certificate_key  cert.key;

    #    ssl_session_cache    shared:SSL:1m;
    #    ssl_session_timeout  5m;

    #    ssl_ciphers  HIGH:!aNULL:!MD5;
    #    ssl_prefer_server_ciphers  on;

    #    location / {
    #        root   html;
    #        index  index.html index.htm;
    #    }
    #}

}
2.1. 全局块
从配置文件开始到events块之间的内容,主要会设置一些影响nginx服务器整体运行的配置指令,主要包括配置运行(Nginx服务器的用户(组)、允许生成的 worker process 数,进程 PID存放路径、日志存放路径和类型以及配置文件的引入等。
- 比如第一行的
worker_processes 1;这个值越大,处理的并发量越大。
2.2. events块
events 块涉及的指令主要影响Nginx服务器与用户的网络连接,常用的设置包括是否开启对多 work process下的网络连接进行序列化,是否允许同时接收多个网络连接,选取哪种事件驱动模型来处理连接请求,每个 wordprocess可以同时支持的最大连接数等。 上述例子就表示每个work process支持的最大连接数为1024;这部分的配置对Nginx的性能影响较大,在实际中应该灵活配置。
2.3. http块
2.3.1 反向代理示例1
实现效果:打开浏览器,在浏览器输入地址www.123.com,跳转到linux系统tomcat主页面。
访问过程解析:
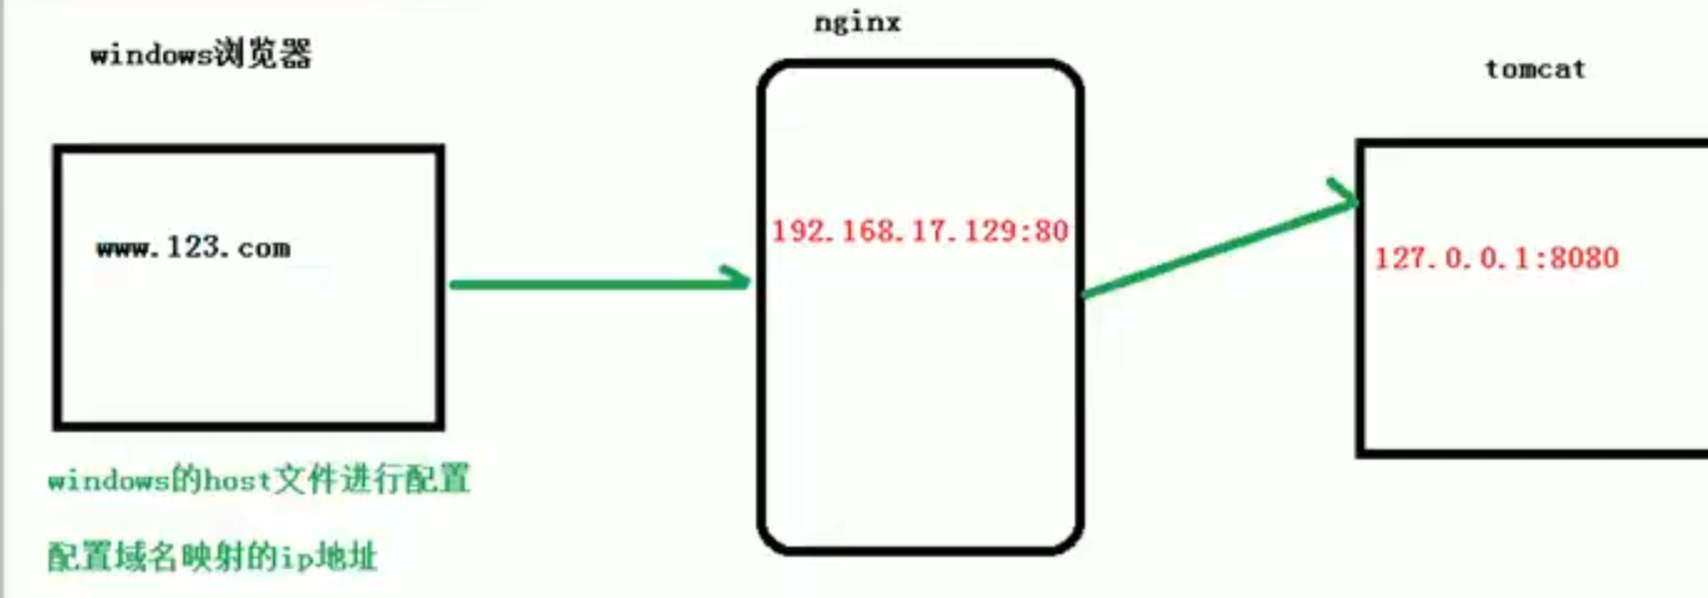
window浏览器输入域名时,都是在host文件里找对应的ip地址,没有就在网上进行dns解析;这就是不直接去访问tomcat,由它和nginx组成反向代理,去访问nginx
- 首先下载tomcat:在core里,下载.tar.gz包,然后解压,再进到解压文件的 bin 目录,通过
./startup.sh脚本启动tomcat服务器(默认是8080端口)- 把8080端口添加通过防火墙(然后就可以去访问了)
在window路径:
vim C:\Windows\System32\drivers\etc\hosts直接添加192.168.2.3 www.123.com此时就能在浏览器www.123.com:8080访问tomcat了- 改nginx的配置文件
server { listen 80; server_name 192.168.23; # 把服务器主机名写上去
location / { root html; proxy_pass http://127.0.0.1:8080; # 新增服务器上tomcat的端口8080地址 index index.html index.htm; }
最后重新启动nginx就可以了。
2.3.2 反向代理实例2
实现效果:使用nginx反向代理,根据访问的路径不同跳转到不同端口的服务中心,nginx监听端口设为9001。 访问 http://127.0.0.1:9001/edu/ 就跳转到127.0.0.1:8081 访问 http://127.0.0.1:9001/vod/ 就跳转到127.0.0.1:8082
- 一台服务器准备两个文件夹,都解压后tomcat,然后去里面修改配置文件 conf/server.xml 具体看下百度,修改默认端口号
进到各自tomcat中,在 webapps/ 里各自创建目录 edu/ vod/ ,并且都在里面写上一个名为a.html文件,内容各自就是
<h1>this is 8081/8082 port<h1># 这个时候用浏览器访问时,端口号后面加上路径 /edu/a.html 或 /vod/a.html 就可以看到写的内容了- 再去改nginx配置文件,新增一个 server就好了
server { listen 9001; server_name 192.168.2.3;
location ~ /edu/ { # 路径中含有edu proxy_pass http://127.0.0.1:8001; }
location ~ /vod/ { # 路径中含有vod proxy_pass http://127.0.0.1:8002; } }
后面192.168.2.3:9001/edu/a.html www.123.com:9001/edu/a.html 结果一样
或是192.168.2.3:9001/vod/a.html www.123.com:9001/vod/a.html
location指令说明
该指令用于匹配URL,location后面跟的url应该可以有正则表达式在里面,
语法如下:location = | ~ | ~* | ^~ /url/ {} # 在url前面的是一些选项
- =:用于不含正则表达式的url前,要求请求字符串与url严格匹配,如果匹配成功,就停止继续向下搜索并立即处理该请求;
- ~:用于表示url包含正则表达式,并且区分大小写;
- ~*:用于表示url包含正则表达式,并且不区分大小写;
- ^*:用于不含正则表达式的url前,要求Nginx服务器找到标识url和请求字符串匹配度最高的location后,立即使用此location处理请求,而不再使用location块中的正则url和请求字符串做匹配。
补充,写FastDFS时,有一个例子,location ~/group[0-9]/ {} # 访问你的网址是这样的 ip:port/group5/aa/bb/123.png (后面就无所谓了)
2.3.3 负载均衡
实现效果:浏览器输入地址 http://192.168.2.3/edu/a.html, 将负载分到各个服务器(即访问的这同一个网址,会将请求分发到不同的服务器)
- 准备两台tomcat服务器,一台端口8001,一台8002
- 在两个tomcat的 webapps里都创建文件夹 edu/ 并在此目录里放上内容不同的 a.html
- 修改nginx的配置文件
… # 上面一些东西就省略了,只写重点部分
http {
…
# 这块是新加的,
my_server是自定义的名字 upstream my_server { server 192.168.2.3:8001; # 把开启服务的机子ip和port都写到这里 server 192.168.2.3:8002; } server { listen 80; server_name 192.168.2.3; #charset koi8-r; #access_log logs/host.access.log main; location / { root html;
# 后面的myserver是上面自定义的名字(就这行是新增的) proxy_pass http://myserver;
index index.html index.htm; } } }
配置负载均衡参数的几种方式:
-
轮训(默认):每个请求按时间顺序逐一分配到不同的后端服务器,如果后端服务器down掉,能自动剔除;
-
weight:默认权重为1,权重越高分配的客户端越多;
upstream myserver { server 192.168.2.3:8001 weight=2;
server 192.168.2.3:8002 weight=5; }
-
ip_hash:每个请求按照访问ip的hash结果分配,这样每一个访客固定的访问一个后端服务器,可以解决Session 的问题(一个客户端访问后,后面永远是访问的同一个服务器)。
upstream myserver {
ip_hash;
server 192.168.2.3:8001 weight=2;
server 192.168.2.3:8002 weight=5; }
-
fair:接后端服务器的响应时间来分配请求,响应时间短的优先分配。
upstream myserver {
server 192.168.2.3:8001;
server 192.168.2.3:8002;
fair; }
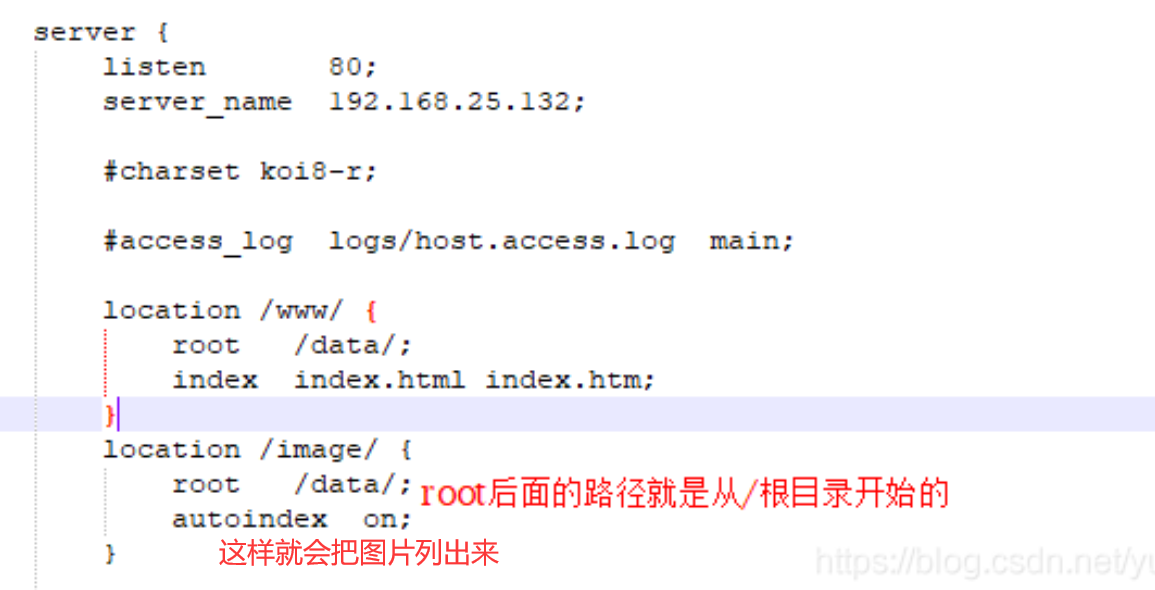
2.3.4 动静分离
不写了,就是把静态资源放一个文件夹(如图片等),一些动态资源放一个文件夹,然后配置两个location
三、配置高可用集群(主从模式)
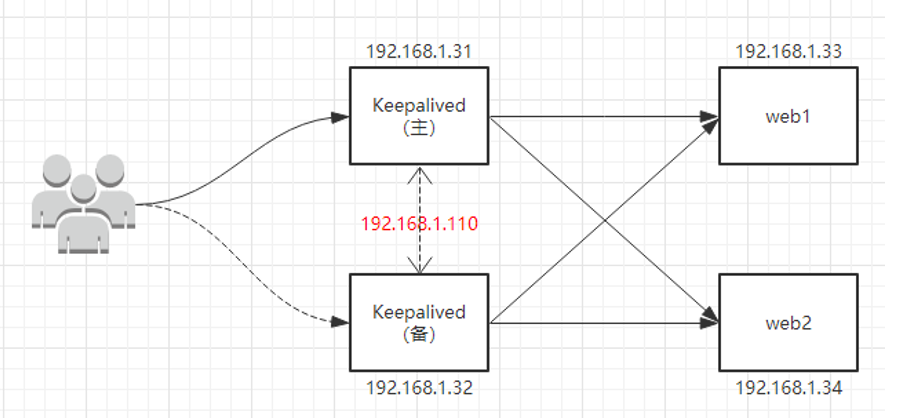
(1)准备两台服务器,都下安装好nginx
(2)都安装Keepalived:yum install keepalived -y # 配置文件/etc/keepalived/keepalived.conf
global_defs {
	notification_email {
	acassen@firewall.loc
	failover@firewall.loc
	sysadmin@firewall.loc
}

notification_email_from Alexandre.Cassen@firewall.loc
smtp_server 192.168.2.4
smtp_connect_timeout 30

router_id LVS_DEVEL      # router_id 后面的名字是我们自己起(要能访问到主机)
# `vim /etc/host`, 添加一行   127.0.0.1   LVS_DEVEL
}

vrrp_script chk_http_port {
	script "/usr/local/src/nginx_check.sh"  # 这是检测脚本的地址,		nginx_check.sh自己写
	interval 2	#(检测脚本执行的间隔)
	weight 2    # 当前主机权重,要是给的 -20 就是主服务器挂了,权重就减20???
}

vrrp_instance VI_1 {
	state MASTER	# 备份服务器上将 MASTER 改为 BACKUP
	interface ens33	  //网卡
	virtual_router_id 51  # 主、备机的 virtual_router_id 必须相同(这个值也应该是自定义)
	priority 80	# 主、备机取不同的优先级,主机值较大,备份机值较小
	advert_int 1     # 每隔1s发一个检测主机还活着

	authentication {   # 校验的一种方式
		auth_type PASS
		auth_pass 1111
	}

	virtual_ipaddress {
		192.168.2.50     // VRRP H 虚拟地址,自己给的  # 可以给多个
	}
}
(3)在
/usr/local/src添加检测脚本nginx_check.sh这个名字可以自己起,要和上面配置名一样#!/bin/bash A=`ps -C nginx –no-header |wc -l` if [ $A -eq 0 ]; then /usr/local/nginx/sbin/nginx sleep 2 if [ `ps -C nginx --no-header |wc -l` -eq 0 ]; then killall keepalived fi fi 注意这是两台服务武器都要的
(4)都启动nginx、keepalived :
systemctl start keepalived.service最终输入虚拟地址,都能访问nginx了,这时再把MASTER的nginx、keepalived关了,在访问虚拟地址,会自动切到备机上的。