note
注意参考==各类库的编译.md==
这篇文章对整体的库有一个整理,有需求时可以去参考一下。
01. fmt 让输出带格式的库
fmt是一个c++格式化的库,挺好用的,也比较简单,源码下载下来,轻松就能编译出来,然后在测试时,直接用cmake中的find_package没搞定,就直接添加的搜索路径: CMakeLists.txt:
cmake_minimum_required(VERSION 3.1)
project(demo)
set(CMAKE_BUILD_TYPE Release)

include_directories(/opt/fmt-9.0.0/include)
link_directories(/opt/fmt-9.0.0/lib64)

add_executable(demo main.cpp)
target_link_libraries(demo fmt)
demo.cpp:(这个在它的官网里也是有的)
#include <string>
#include <vector>
#include <fmt/core.h>
#include <fmt/chrono.h>
#include <fmt/ranges.h>
#include <fmt/color.h>

int main() {
	fmt::print("hello world\n");

	std::string s = fmt::format("The answer is {}.\n", 42);
	fmt::print(s);

	// 1.格式化时间
	using namespace std::literals::chrono_literals;
	fmt::print("Default format: {} {} \n", 42s, 100ms);
	fmt::print("strftime-like format: {:%H:%M:%S}\n", 3h + 15min + 30s);

	// 2.直接打印vector
	std::vector<int> v = { 1, 2, 3 };
	fmt::print("{}\n", v);

    //
    fmt::print("Hello, {}!", "world");  // 类 Python 的语法风格
	fmt::printf("Hello, %s!", "world");

	// 3.带颜色、格式的输出
	fmt::print(fg(fmt::color::crimson) | fmt::emphasis::bold,
		"Hello, {}!\n", "world");
	fmt::print(fg(fmt::color::floral_white) | bg(fmt::color::slate_gray) |
		fmt::emphasis::underline, "Hello, {}!\n", "мир");
	fmt::print(fg(fmt::color::steel_blue) | fmt::emphasis::italic,
		"Hello, {}!\n", "世界");

	return 0;
}
02. Eigen 矩阵运算
使用方式:
-
方式一:它是头文件类型的,添加头文件路径就可以直接使用了。 windows上,直接把.zip压缩包解压放一个地方,比如为D:\lib\eigen-3.4.0, 然后直接在C/C++->常规->附加包含目录 把上面的路径添加进去就好了
-
方式二:make && make install 的方式
git clone https://gitlab.com/libeigen/eigen –branch 3.4
mkdir eigen_build && cd eigen_build
cmake -DCUDA_TOOLKIT_ROOT_DIR=/usr/local/cuda/ ..
make && make install # 这是安装在系统默认位置,这个库就默认位置用吧,版本影响不会太大,就用3.4最新的。
注:cmake时这样指定使用cuda,才比较好,主要是在编译三维重建项目“openMVS”时,没这样指定,make编译出了很多问题,比如这样“no suitable constructor exists to convert from “float” to “Eigen::half””的错误,像上面指定了cuda路径的才不报错。
常用头文件:它一些矩阵常用性质和方法,看这。
| Module | Header file | Contents |
|---|---|---|
| Core | #include <Eigen/Core> | Matrix和Array类,基础的线性代数运算和数组操作 |
| Geometry | #include <Eigen/Geometry> | 旋转、平移、缩放、2维和3维的各种变换 |
| LU | #include <Eigen/LU> | 求逆,行列式,LU分解 |
| Cholesky | #include <Eigen/Cholesky> | 豪斯霍尔德变换,用于线性代数运算 |
| SVD | #include <Eigen/SVD> | SVD分解 |
| QR | #include <Eigen/QR> | QR分解 |
| Eigenvalues | #include <Eigen/Eigenvalues> | 特征值,特诊向量分解 |
| Sparse | #include <Eigen/Spare> | 稀疏矩阵的存储和一些基本的线性运算 |
| 稠密矩阵 | #include <Eigen/Dense> | 包含了Core/Geometry/LU/Cholesky/SVDIQR/Eigenvalues模块 |
| 矩阵 | #include <Eigen/Eigen> | 包含了Dense和Sparse(整合库) |
使用demo:
- 初始化一个单位矩阵:Eigen::Matrix4f matrix = Eigen::Matrix4f::Identity();
#include <iostream>
#include <cmath>
#include <Eigen/Core>
/*
官方的关于vector和matrix的文档:
https://eigen.tuxfamily.org/dox/group__TutorialMatrixArithmetic.html
*/
int main() {
	//std::cout << std::sin(30.0 / 180.0*acos(-1)) << std::endl;
	//Eigen::Vector3f v(1.0f, 2.0f, 3.0f);

	//Eigen::Matrix3f i, j;
	//i << 1.0, 2.0, 3.0, 4.0, 5.0, 6.0, 7.0, 8.0, 9.0;   // 注意只能这种初始化方式
	//j << 2.0, 3.0, 1.0, 4.0, 6.0, 5.0, 9.0, 7.0, 8.0;
	// 或者 MatrixXf a(2,3); a << 1, 2, 3, 4, 5, 6;

	// 题:将点p逆时针旋转45°
	Eigen::Vector3f p(2.0f, 1.0f, 1.0f);  // 默认打印出来形式是列向量,但运算时还是看作1行2列

	// 逆时针旋转45°
	float angle = 45.f / 180.f * std::acos(-1);  // std::acos(-1)为π,这是三角函数必须给弧度制
	// 方式一:原理 https://blog.csdn.net/whocarea/article/details/85706464
	Eigen::Vector2f out;
	out[0] = p[0] * std::cos(angle) - p[1] * std::sin(angle);
	out[1] = p[0] * std::sin(angle) + p[1] * std::cos(angle);
	std::cout << out << std::endl;

	// 方式二:其实是一样的,就是将上面操作弄成了一个矩阵  (这个额外加了一点,使用了齐次坐标)
	Eigen::Matrix3f mat;
	mat << std::cos(angle), -std::sin(angle), 1.f, std::sin(angle), std::cos(angle), 2.f, 0.f, 0.f, 1.f;
	std::cout << mat * p << std::endl;  // 这顺序不能变,就是对上面列向量使用的的进一步说明
}
上面是直接按照固定的把旋转矩阵写出来,不好写,按照下面这样来:平移、缩放、旋转
#include <iostream>
#include <Eigen/Core>
#include <Eigen/Geometry>

int main() {
	// 1、定义一个4*4的单位矩阵
	Eigen::Matrix4f matrix = Eigen::Matrix4f::Identity();
	// 2、仿射变换,需要头文件<Eigen/Geometry>
	Eigen::Affine3f trans = Eigen::Affine3f::Identity();
	// (2.1)在X轴上定义一个2.5米的平移
	trans.translation() << 2.5, 0.0, 0.0;
    // (2.1)要缩放的话,可以
    trans.scale(0.5);  // 所有轴整体缩放,每个轴不同的值还不知道
	// (2.2)在Z轴上旋转45度;X轴的话就是Eigen::Vector3f::UnitX();
	trans.rotate(Eigen::AngleAxisf(45, Eigen::Vector3f::UnitZ()));
	// (2.3)得到旋转矩阵
	matrix = trans * matrix;

	std::cout << matrix << std::endl;
	system("pause");
	return 0;
}
注:2.2中,可以绕几个轴旋转,括号里就这么写: Eigen::AngleAxisf(45, Eigen::Vector3f::UnitZ()) * Eigen::AngleAxisf(60, Eigen::Vector3f::UnitX())
给元素开方:
#include <iostream>
#include <Eigen/Dense>
int main(int argc, char* argv[]) {
	Eigen::MatrixXd bigMat(1000, 1000);   // 注意这种Xd、Xf这种写法

	Eigen::Matrix3d mat;
	mat << 4, 9, 16, 25, 36, 49, 64, 81, 100;
    // 注意:使用array()函数将matrix对象转换为array对象,以便使用array的sqrt函数。
	Eigen::Matrix3d res_sqrt = mat.array().sqrt();
	std::cout << "Square root of the matrix:\n" << res_sqrt << std::endl;
	return 0;
}
03. json
c++的json库,有几个,用的时候看情况吧:
-
json:这个star最多,用的比较多,就先用这吧。就一个文件 json对象调用 .dump() 函数就可以将其转换成字符串
-
#include "json.hpp" using json = nlohmann::json; json content = { {"timeStamp", 20230818162957384}, {"cameraCode", 5}, {"signCode", "5_6_7"} }; json req_json = { {"eventType", 32000}, {"content", content.dump()} // .dump()将其转换成字符串 }; -
用这个库来读取json文件: (是一labelme的标注的json结果来写的)
#include <iostream>
#include <fstream>
#include <map>

#include "json.hpp"
using json = nlohmann::json;

int main(int argc, char *argv[]) {
	std::ifstream ifs("./resources/marks/behind.json");
    if (!ifs.is_open()) {
        std::cerr << "打开失败\n";
        return -1;
    }
    // json data = json::parse(ifs);    // 这行和下面两行是一个意思
    json data;
    ifs >> data;
    ifs.close();

    // 1、能直接打印出来(4代表格式化时的缩进,也可以是2或其他)
    std::cout << data.dump(4) << std::endl;

    // 2、
    for (json &shape : data.at("shapes")) {
        std::string label = shape.at("label");
        json &points = shape.at("points");
        std::cout << label << ": " <<  points <<"\n" <<std::endl;
        std::cout << points[0] << std::endl;   // [56.05,459.37]  一个点的坐标
        std::cout << points[0][0] << std::endl;  // 56.05
        std::cout << points[0][0].type_name() << std::endl;  // number
        std::cout << points[0][0].is_number_float() << std::endl;  // 1  // 还有其他判断函数,是不是整数、string等
        std::cout << points.type_name() << std::endl;  // array  (多边形的坐标)

        // 或者这样直接用其对应的类型来接收
        float a = points[0][0];
        std::vector<std::vector<float>> b = points;
        std::cout << a << std::endl;  // 56.05
        std::cout << b[0][0] << std::endl;  // 56.05

        std::vector<std::array<float, 2>> arr_points = position.at("points");
        std::cout << arr_points[0][0] << std::endl;  // 56.05
        break;
    }
}
-
-
json11:这个就几个文件,非常简洁;
-
RapidJSON:腾讯开源的,star也不错,有中文文档;
-
jsoncpp:放这吧。6.9k
-
simdjson:这个16.6kstar,每秒可解析千兆字节的高性能 JSON 解析库
04. spdlog 日志库
spdlog。(源码练习吧)c++的日志库,非常建议上手,star也非常多;demo在其readme中写得非常明白了。
另外一个c编写的,放这吧:EasyLogger,一款超轻量级(ROM<1.6K, RAM<0.3k)、高性能的 C/C++ 日志库
下面说一下spdlog日志库,按照其默认的方式来,可以以头文件的形式,一般也默认编译成了静态库来使用。
它还支持每天保存一个独立的日志文件,也可以设置每个文件最大多少,最多存多少个。
-
编译:下载源码后:(如果是交叉编译,也许需要先export指定CXX这个环境变量为aarch64-linux-gnu-g++)
- cd spdlog && mkdir build && cd build
- cmake -DCMAKE_INSTALL_PREFIX=../my_install && make -j4 && make install
-
Demo:(上面默认编译的就是静态库)
-
CMakeLists.txt
cmake_minimum_required(VERSION 3.11) project(spdlog_examples CXX) set(spdlog_DIR ${CMAKE_SOURCE_DIR}/3rdparty/spdlog/lib/cmake/spdlog) # 指定.cmake的路径 find_package(spdlog REQUIRED) # Example of using pre-compiled library add_executable(example example.cpp) target_link_libraries(example spdlog::spdlog) # 可指定变量名 set(spdlog_LIBS spdlog::spdlog) # 下面这样是官方示例让这么写,放这里,可能是针对win上的mingw使用 # target_link_libraries(example PRIVATE spdlog::spdlog $<$<BOOL:${MINGW}>:ws2_32>) -
example.cpp
#include <spdlog/spdlog.h>            // #include "spdlog/spdlog.h"  // 这两种都是OK的
int main(int argc, char **argv) {
    // info下,除了debug都会输出,debug下是包括debug所有都会输出,一般只用这两个吧
    // 其它的warn、error级别是其及以上级别的日志才会输出
    // spdlog::set_level(spdlog::level::info);  // 默认是info
    spdlog::info("Support for floats {:.2f}", 1.23456);  // 1.23
    spdlog::warn("something {}, maybe {}", 123, "hello!");
    spdlog::error("Positional args are {1} {0}..", "too", "supported");
    spdlog::critical("Support for int: {0:d};  hex: {0:x};  oct: {0:o}; bin: {0:b}", 42);
    spdlog::info("{:<30}", "left aligned");

    spdlog::set_level(spdlog::level::debug); // Set global log level to debug
    spdlog::debug("This message should be displayed..");

	return 0;
}
效果:

-
以上是最简单快捷的使用方法,直接导入头文件,然后终端输出的方式。
下面这是将其存进日志文件,或是同时终端输出:
#include <spdlog/spdlog.h>
#include <spdlog/sinks/daily_file_sink.h>           // 每天一个日志文件需要
#include <spdlog/sinks/rotating_file_sink.h>        // 文件大小到一定程度切割成新文件需要
#include <spdlog/sinks/stdout_color_sinks.h>        // 彩色输出到终端需要

// 宏里面直接执行了两次日志输出,一次是默认的logger输出(下面函数中将到控制台的输出设为默认的)
// 一次是到日志文件中的输出
#define DEBUG(...) SPDLOG_LOGGER_DEBUG(spdlog::default_logger_raw(), __VA_ARGS__);SPDLOG_LOGGER_DEBUG(spdlog::get("daily_logger"), __VA_ARGS__)
#define LOG(...) SPDLOG_LOGGER_INFO(spdlog::default_logger_raw(), __VA_ARGS__);SPDLOG_LOGGER_INFO(spdlog::get("daily_logger"), __VA_ARGS__)
#define WARN(...) SPDLOG_LOGGER_WARN(spdlog::default_logger_raw(), __VA_ARGS__);SPDLOG_LOGGER_WARN(spdlog::get("daily_logger"), __VA_ARGS__)
#define ERROR(...) SPDLOG_LOGGER_ERROR(spdlog::default_logger_raw(), __VA_ARGS__);SPDLOG_LOGGER_ERROR(spdlog::get("daily_logger"), __VA_ARGS__)


void register_logger() {
    // 这里是为了说明类型,和其它的使用方式(“daily_logger”是我们自己定义的一个名字,后续好获取的)
    // std::shared_ptr<spdlog::logger> logger = spdlog::daily_logger_mt("daily_logger", "logs/daily.txt", 0, 0);
    // spdlog::get("daily_logger")->info("hello");
    // logger->info("world");

    // 1、按文件大小的logger(以字节为单位,下面代表是单个文件最大100M,到了后创建新文件,最多创建3个,满了后会删除旧的日志文件)(我一般就用这个吧)
    //auto file_logger = spdlog::rotating_logger_mt("file_log", "log/log.log", 1024 * 1024 * 100, 3);

    // 2、每天2:30 am 新建一个日志文件的logger(会自己创建logs/V01/这个路径,如果不存在)
    // 注:这种不能指定多少天自己删除旧日志,只能外部脚本处理
    auto logger = spdlog::daily_logger_mt("daily_logger", "logs/V01/daily.txt", 2, 30);
    // 遇到warn flush日志,防止丢失
    logger->flush_on(spdlog::level::warn);
    //每三秒刷新一次(不是一直往硬盘中写,提高效率)
    spdlog::flush_every(std::chrono::seconds(3));

    // 3、设置终端输出的logger
    // 其它地方:spdlog::get("daily_logger")也是能获取到这个终端输出的对象的
    auto console = spdlog::stdout_color_mt("console");
    // 这是设置这么多生成的logger哪个为默认的,即不用指定名字就能调用的
    spdlog::set_default_logger(console);
    spdlog::set_level(spdlog::level::debug);  // Set global log level to debug,非必须

    // 感觉就用默认吧,只是知道可以这么改,这太冗余了
    spdlog::warn("这是更改格式前的输出");
    // change log pattern
    // %s:文件名
    // %#:行号
    // %!:函数名
    // %e:毫秒
    // spdlog::set_pattern("%Y-%m-%d %H:%M:%S.%e [%l] [%t] - <%s>|<%#>|<%!>,%v");

    // 这是宏的实现方式,前面几行也写了非宏的实现方式
    LOG("test info");
    ERROR("test error");
    spdlog::warn("这是更改格式后的输出");
}

int main(int argc, char *argv[]) {
    // 设置日志格式
    register_logger();

    LOG("这是:{}", "hello world");
    // 这是这样做的默认结果:
    // [2025-01-22 10:37:20.746] [file_log] [info] [main.cpp:55] 这是:hello world

    // 注意:上面这样自己创建了logger对象,并将其设置为默认的日志对象后,其它任何文件只要导入spdlogde的头文件,那默认的就是自己设置好的
    spdlog::info("hello");   // 因为这函数点进去也是调用的默认日志对象

    // Release and close all loggers
    spdlog::drop_all();

    return 0;
}
注:这个日志库使用了单例模式,在这里一次注册后,其它文件导入后就直接使用了。
- spdlog中各对象都分为多线程与单线程版本:
*_st:单线程版本,不用加锁,效率更高。*_mt:多线程版本,用于多线程程序是线程安全的。
-
注意区分,宏里面:
// 默认的logger获取到的是普通指针;(这只是了解) spdlog::logger *a_logger = spdlog::default_logger_raw(); // 另外自己起名字注册的logger,获取到的是智能指针 std::shared_ptr<spdlog::logger> b_logger = spdlog::get("daily_logger"); - 上面笔记来源教程(已都看过,放这里吧):教程1、教程2(异步日志,放这里了解吧)、教程3(更细的日志样式参数说明)
05. indicators 进度条库
indicators:一个c++编写的,用于c++的进度条库,可以是单文件的使用,很方便。直接去看它的README,gif图片样例给的非常生动,以后尽可能都搞一下吧。
还有其它的例子(github网络不好不一定看得到,下下来就好),这里在写一个它README的例子吧:
-

#include <chrono>
#include <indicators/cursor_control.hpp>
#include <indicators/progress_bar.hpp>
#include <thread>

int main() {
  using namespace indicators;

  // Hide cursor
  show_console_cursor(false);

  indicators::ProgressBar bar{
    option::BarWidth{50},
    option::Start{" ["},
    option::Fill{"█"},
    option::Lead{"█"},
    option::Remainder{"-"},
    option::End{"]"},
    option::PrefixText{"Training Gaze Network 👀"},
    option::ForegroundColor{Color::yellow},
    option::ShowElapsedTime{true},
    option::ShowRemainingTime{true},
    option::FontStyles{std::vector<FontStyle>{FontStyle::bold}}
  };

  // Update bar state
  while (true) {
    bar.tick();
    if (bar.is_completed())
      break;
    std::this_thread::sleep_for(std::chrono::milliseconds(1000));
  }

  // Show cursor
  show_console_cursor(true);

  return 0;
}
06. taskflow 高效的并发
taskflow:一个 C++ 头文件库,让你以简单的几行代码就可以实现高效的并发。示例代码如下:
The following program (simple.cpp) creates four tasks A, B, C, and D, where A runs before B and C, and D runs after B and C. When A finishes, B and C can run in parallel.
#include <taskflow/taskflow.hpp>  // Taskflow is header-only

int main(){

  tf::Executor executor;
  tf::Taskflow taskflow;

  auto [A, B, C, D] = taskflow.emplace(  // create four tasks
    [] () { std::cout << "TaskA\n"; },
    [] () { std::cout << "TaskB\n"; },
    [] () { std::cout << "TaskC\n"; },
    [] () { std::cout << "TaskD\n"; }
  );

  A.precede(B, C);  // A runs before B and C
  D.succeed(B, C);  // D runs after  B and C

  executor.run(taskflow).wait();

  return 0;
}
07. dbg-macro 宏debug
dbg-macro:这个项目里就一个头文件,拿来就能用,debug时打日志、变量非常好用,除基本信息外,还输出变量名和类型。以后运行要看某处数据可以试试。
-
不建议vs上使用,因为vs打开的终端无法带颜色的输出,所有看起来很怪,linux上用。
-
直接下载,然后放进 /usr/include # 那它现在就在 /usr/include/dbg-macro/
-
然后写一个 vim /usr/include/gdb.h ,里面的内容是:
#include <dbg-macro/dbg.h> #define gdb dbg -
这样以后直接导包 #include <gdb.h> 宏也是用gdb,跟GDB贴和起来,不再去记忆它原本的dbg(当然原来的宏也是生效的)
-
下面的是官方README中的示例:(注释我是用了上面操作,官方的是dbg)
#include <gdb.h>

// You can use "gdb(..)" in expressions:
int my_func(int n) {
    if (gdb(n <= 1)) {
        return gdb(1);
    }
    else {
        return gdb(n * my_func(n - 1));
    }
}

int main() {
    // 1、
    const int a = 2;
    const int b = gdb(3 * a) + 1;  // [example.cpp:18 (main)] 3 * a = 6 (int32_t)

    // 2、
    std::vector<int> numbers{ b, 13, 42 };
    gdb(numbers);  // [example.cpp:21 (main)] numbers = {7, 13, 42} (std::vector<int32_t>)

    // 3、在一个表达式中
    my_func(4);

    // 4、获取当前时间(比较直接简单,获取时间戳和用时还是用笔记里另外的)
    gdb(gdb::time());

    // 5、多个目标(像中间中记得用括号括起来)
    gdb(42, (std::vector<int>{2, 3, 4}), "hello", false);

    return 0;
}
进阶:Printing type names
dbg(…) already prints the type for each value in parenthesis (see screenshot above). But sometimes you just want to print a type (maybe because you don’t have a value for that type). In this case, you can use the dbg::type<T>() helper to pretty-print a given type T. For example:
template <typename T>
void my_function_template() {
  using MyDependentType = typename std::remove_reference<T>::type&&;
  dbg(dbg::type<MyDependentType>());
}
08. ThreadPool 线程池
ThreadPool:一个简单的 C++11 线程池实现,就两个文件,非常简单易用。
09. 读取 CSV 文件库
fast-cpp-csv-parser:cvs解析的库,就一个头文件非常简单。
10. args 参数解析库
args:一个简单的header-only文件(args.hxx)的c++参数解析器库。应该是灵活和强大的,并试图与Python标准argparse库的功能兼容,简单看demo,用法和python那个很相似,但不完全相同这种传参,一般不给–input这样的前缀。
就英伟达的instant-ngp项目中就是用的这个库做的参数的处理,可以学习。
C++小知识中,19点,格式化接受的参数中还讲到了用 opencv来格式化接收的参数。
先放这里,如果没有用到opencv,就使用这种方式,如果用到opencv,就采用上一行c++小知识中的opencv接受参数的形式。
#include <args.hxx>

int parse_args(int argc, char* argv[], std::string &source_name, std::string &config_path) {
    args::ArgumentParser parser("这是传递受电弓参数文件");
    args::HelpFlag help(parser, "help", "DIsplay this help menu", {'h', "help"});

    args::Positional<std::string> _source_name(parser, "source_name", "项点名称");
    args::Positional<std::string> _config_path(parser, "config_path", "配置文件路径");

    try {
        parser.ParseCLI(argc, argv);
    }
    catch (args::Help) {
        // 这可以直接打印是因为 args::ArgumentParser这个类去重载了 <<
        // 想要用 spdlog::info()打印的话,可借助 std::ostringstream
        std::cout << parser;
        return 0;
    }
    catch (args::ParseError e) {
        std::cerr << e.what() << std::endl;
        std::cerr << parser;
        return -1;
    }
    catch (args::ValidationError e) {
        std::cout << e.what() << std::endl;;
        std::cerr << parser;
        return -1;
    }

    if (!_source_name) {
        std::cout << "必须指定项点名称" <<std::endl;
        return -1;
    }
    if (!_config_path) {
        std::cout << "必须指定配置的yaml文件路径" <<std::endl;
        return -1;
    }

    source_name = args::get(_source_name);
    config_path = args::get(_config_path);
    // 参数传递后,特别是给的文件的,一定要判断一下文件在不在,c++小知识19点里写到有
    return 1;
}

int main(int argc, char* argv[]) {
    std::string source_name;
    std::string config_path;
    if (parse_args(argc, argv, source_name, config_path) != 1) {
        return 0;
    }
    return 0;
}
/*
	- 使用方法:
		查看帮助:./main -h  或是 ./main --help    # 上面{'h', "help"}决定的可以这么写
		位置传参:./main  V02  ./config/default_config.yaml       # 一定要按照这个位置顺序去写,位置决定的(暂时只能这种)

    - 使用opencv的类cv::CommandLineParser,可以实现:
    	./main  --source_name=V02  --yaml_path=./config/default_config.yaml
*/
是否启用这种bool值可以这么传递(结合上面一起看)
-
args::Flag foo(group, "foo", "The foo flag", {'f', "foo"});

if (foo) { std::cout << "foo" << std::endl; }

使用:./main  -f   或是 ./main --foo
11. cpp-httplib
cpp-httplib:一个文件的 C++ HTTP/HTTPS 库。这是一个用 C++11 写的仅头文件、跨平台的 HTTP/HTTPS 服务器端和客户端库,使用时十分方便,只需在代码中引入 httplib.h 文件。快速使用还不错,搜狗的workflow也还可以。
最简单的Demo:(有需求时,先去看它的README,写得比较详细)
-
client:(进去看它的主页,用这直接进行post请求)
-
简单示例:
#define CPPHTTPLIB_OPENSSL_SUPPORT #include "path/to/httplib.h" // HTTP httplib::Client cli("192.168.108.218", 8080); // HTTPS httplib::Client cli("192.168.108.218", 8080); httplib::Client cli("192.168.108.218", 8080); auto res = cli.Get("/hi"); // 等同访问 http://192.168.108.218:8080/hi std::cout << "status:" << res->status << std::endl; // 200 std::cout << "body:" << res->body << std::endl; // Hello World! -
然后同样用这发一个post请求:还用了上面的json库
#include <iostream>
#include "httplib.h"      // 这个项目里下的单独的文件
#include "json.hpp"       // 上面json库的第一个里下的单独的文件

int main(int argc, char** argv) {
	using json = nlohmann::json;
	json content = {
		{"deviceID", 0},
		{"timeStamp", 20230818162957384},
		{"toolsCode", "1_2_5_13"},
	};
	json req_json = {
		{"eventType", 32000},
		{"content", content.dump()}
	};
	// json对象调用 .dump() 函数可以将其转换为字符串。
	std::cout << req_json.dump() << std::endl;

	httplib::Headers headers = {
		{"content-type", "application/json"}
	};

	httplib::Client cli("192.168.108.52", 7714);
	auto res = cli.Post("/iot/http/push", headers, req_json.dump(), "application/json");
    // requests.post("http://192.168.108.52:7714/iot/http/push", headers=headers,data=json.dumps(req_json))  # python
	// 返回的结果是指针的,一定要判断是不是空指针,不然网络不可达,直接使用res会崩溃,使用try包裹都不行
	if (res) {
		std::cout << "status:" << res->status << std::endl;
		std::cout << "body:" << res->body << std::endl;
	}
	else {
		std::cerr << "消息发送失败,可能是目标网络不不可达,10秒后再次尝试..." << std::endl;
         // 通过这,可以看到具体是什么原因失败,httplib::Error是一个枚举类
         httplib::Error err = res.error();
         std::cerr << "HTTP error: {}" << httplib::to_string(err) << std::endl;
		std::this_thread::sleep_for(std::chrono::seconds(10));
	}
	return 0;
}
注:下次用搜狗的试下吧。这个好像有bug。 auto res = cli.Post(“/iot/http/push”, headers, req_json.dump(), “application/json”); 这个能成功,但是发送一会后这句就会卡一下,然后下面打印状态就会报“Exception has occurred. Segmentation fault”。然后又能发一会,等下又会卡。后面发现主要原因还是因为后端接收数据的问题,才导致这卡顿,应该用起来还是问题不大。
-
-
Server (Multi-threaded): 注:因为这是多线程,g++编译时要加 -lpthread ,主要这个库不是linux默认里的,所以需要手动指定。
-
简单Demo:
#define CPPHTTPLIB_OPENSSL_SUPPORT // 非必须 #include "path/to/httplib.h" // HTTP httplib::Server svr; // HTTPS httplib::SSLServer svr; svr.Get("/hi", [](const httplib::Request &, httplib::Response &res) { res.set_content("Hello World!", "text/plain"); }); // 监听本机8080端口(别的机器访问记得要开启8080端口) svr.listen("127.0.0.1", 8080); // linux建议用 "0.0.0.0" 代表所有机器都可以访问 -
语音识别中的server服务:主要是接收 form-data 这样带文件数据的请求(还带中断机制)
#include <fstream>
#include <filesystem>

#include <spdlog/spdlog.h>
#include <httplib.h>

#include "zipformer.h"

// 信号中断回调函数
static std::atomic<bool> keepRuning(true);
static void signalHandler(int signum) {
    spdlog::info("Interrupt signal ({}) received.", signum);
    keepRuning.exchange(false);
}

/**
 * @brief 语音识别服务,接收POST请求,处理请求中form-data中key为"audio"的.wav格式的音频文件,并返回对应文本结果
 *
 * @param server httplib实例化对象的指针
 * @param zipformer zipformer实例化对象的指针
 */
void run_server(httplib::Server *server, ZipFormer::ZipFormer *zipformer) {
    // 创建存音频文件的临时文件夹
    std::string file_save_path = "./temp/";
    try {
        if (!std::filesystem::exists(file_save_path)) {
            std::filesystem::create_directories(file_save_path);
        }
    }
    catch (const std::filesystem::filesystem_error &e) {
        spdlog::error("[ERROR] Error creating or checking folder: {}", e.what());
        return;
    }

    // 1、/hi get路由
    server->Get("/hi", [](const httplib::Request &, httplib::Response &res) { res.set_content("hello world!", "text/plain"); });

    // 2、/upload post路由,上传key为'audio'的格式为'.wav'的音频文件。
    server->Post("/upload", [&](const httplib::Request &req, httplib::Response &res) {
        std::string key = "audio";
        auto size = req.files.size();
        bool ret = req.has_file(key);
        if (!ret) {
            // 错误请求
            res.status = 400;
            res.set_content("文件key错误,请检查是否为: " + key, "text/plain");
            return;
        }

        const auto &file = req.get_file_value(key);
        std::string filename = file.filename;
        // 仅支持.wav 格式的数据
        if (filename.substr(filename.size() - 4) != ".wav") {
            res.status = 400;
            res.set_content("数据类型不支持,仅支持'.wav'格式的音频文件.", "text/plain");
            return;
        }

        std::string filepath = file_save_path + filename;
        std::ofstream ofs(filepath, std::ios::binary);
        if (!ofs.is_open()) {
            res.status = 500; // 服务器内部错误
            res.set_content("Failed to open file", "text/plain");
            return;
        }

        ofs.write(file.content.data(), file.content.size());
        ofs.close();

        // 检测结果
        try {
            std::string result = zipformer->run(filepath);
            spdlog::info("{}: {}", filename, result);

            res.status = 200;
            res.set_content(result, "text/plain");
            std::filesystem::remove(filepath);
        }
        catch (...) {
            res.status = 500;
            res.set_content("语音识别服务内部错误.", "text/plain");
        }
    });

    spdlog::info("监听: http://192.168.108.149:6789");
    // 阻塞调用,直到对象调用 stop() 函数来安全结束。
    server->listen("0.0.0.0", 6789);
}

int main(int argc, char *argv[]) {
    std::string encoder_path = argv[1];
    std::string decoder_path = argv[2];
    std::string joiner_path = argv[3];
    std::string audio_path = argv[4];

    // 注册信号处理程序(写成 std::signal 也是一样的)
    signal(SIGINT, signalHandler);  // ctrl + c
    signal(SIGTERM, signalHandler);  // kill PID

    // 音频识别对象
    ZipFormer::ZipFormer zipformer(encoder_path, decoder_path, joiner_path);
    // 本地语音测试文件
    // spdlog::info("\n\nresult: {}", zipformer.run(audio_path));

    // 服务器对象
    httplib::Server server;

    // 服务线程
    std::thread server_thread(run_server, &server, &zipformer);

    // 阻塞主线程,直到接收到退出信号(或许用多线程的信号量来实现比较好)
    while (keepRuning) {
        std::this_thread::sleep_for(std::chrono::seconds(1));
    }

    // 停止服务(这是成员函数)
    server.stop();
    if (server_thread.joinable()) {
        server_thread.join();
    }

    spdlog::info("服务已安全退出.");
    return 0;
}
用postman的请求示例:

-
CppNet
CppNet:这个国人学习中写的,感觉还不错,文档很全,中文支持不错,先放这里。
crow
crow、Crow:这是受flask启发开发的库,用起来跟flak比较相近,后面有需要,先试试看看这个库。
12. Catch2 用例测试库
测试库还有googletest,暂时还没用过,或者doctest这个单文件测试项目。
Catch2:这是一个用例测试库,使用起来非常方便,是在学习inifile-cpp这个ini文件解析库时看到的,要使用的话,就按照ini解析库中的用例去使用,也会知道该怎么写catch2的相应的CmakeLists.txt.
下面是inifile-cpp中的简单测试示例:全是用TEST_CASE宏包裹起来的测试case,主函数是另一个文件定义起来的,具体看ini这个项目。
#include "inicpp.h"
#include <catch2/catch.hpp>
#include <cstring>
#include <sstream>

TEST_CASE("parse ini file", "IniFile") {
    std::istringstream ss(("[Foo]\nbar=hello world\n[Test]"));
    ini::IniFile inif(ss);

    REQUIRE(inif.size() == 2);
    REQUIRE(inif["Foo"]["bar"].as<std::string>() == "hello world");
    REQUIRE(inif["Test"].size() == 0);
}

TEST_CASE("test the error", "the func()") {
	/*
	假设外部有一个函数要测试,里面有throw的代码,就要测试看是否会触发
	#include <stdexcept>
	int func(int a, int b) {
    if (b == 0)
        throw std::logic_error("divided is zero!");  # 需要这个头文件
    return a / b;
	}
	*/
    REQUIRE_THROWS(func(5, 0));  // 这就会测试通过
    REQUIRE_THROWS(func(5, 1));  // 这不会触发func中的异常,测试就不会通过
}
13. 队列
concurrentqueue:无锁队列,看起来还可以,好像是多线程的队列这种,可带锁不带锁,单文件使用。
readerwriterqueue:也是上面作者写的,单生产者,单消费者的无锁队列。
14. yaml-cpp
yaml-cpp这是用来处理yaml文件的。
注:linux下,当静态库libyaml-cpp.a与动态库libyaml-cpp.so同时存在于同一路径中,使用target_link_libraries(main yaml-cpp),会优先选择动态库,动态库不满足时,就会再选用静态库,如果想优先选择静态库,可在链接时把库名写完整为yaml-cpp.a
对应的CMakeLists.txt
-
动态库的方式: 注意点:从源码编译的时候,cmake一定要开启
-DYAML_BUILD_SHARED_LIBS=ON,即编译成动态库,静态库是需要直接连接编译到程序中,单独能编出来但不能使用。cmake_minimum_required(VERSION 3.1) set(CMAKE_BUILD_TYPE "Debug") # Enable C++11 set(CMAKE_CXX_STANDARD 11) # 有的只要了这一句 set(CMAKE_CXX_STANDARD_REQUIRED TRUE) # 尽量都要,不然有时会因为这出问题 # 方式一:提前编译成动态库,放在某个地方,然后调用的方式 set(YAML_CPP_DIR D:\\lib\\yaml-cpp\\my_install) include_directories(${YAML_CPP_DIR}\\include) link_directories(${YAML_CPP_DIR}\\lib) add_executable(main main.cpp) target_link_libraries(main yaml-cppd.lib) file(COPY ${CMAKE_CURRENT_SOURCE_DIR}/coco.yaml DESTINATION ${CMAKE_CURRENT_BINARY_DIR}/) file(COPY ${YAML_CPP_DIR}/bin/yaml-cppd.dll DESTINATION ${CMAKE_CURRENT_BINARY_DIR}/) # 不添加环境变量的话,就要把动态库复制过去 -
静态库的方式(主要还是库原本的CMakeLists.txt里做了静态、动态区别的处理):
- 除了下面的方式,也可以提前把源码编译成静态库(一般在linux下使用.a),然后其它跟上面动态库一模一样,只是写成target_link_libraries(main yaml-cppd.a) # .a可以不要
cmake_minimum_required(VERSION 3.1) set(CMAKE_BUILD_TYPE "Debug") # Enable C++11 set(CMAKE_CXX_STANDARD 11) # 有的只要了这一句 set(CMAKE_CXX_STANDARD_REQUIRED TRUE) # 尽量都要,不然有时会因为这出问题 # 方式二:跟源码放一起,然后编译成静态库,直接打包成一起(这个库默认就是这样推荐使用) include(FetchContent) FetchContent_Declare( yaml-cpp SOURCE_DIR ${CMAKE_SOURCE_DIR}/3rdparty/yaml-cpp # 这是把源码下到了本地3rdparty/yaml-cpp中,也可以指定仓库地址去拉取 # GIT_REPOSITORY https://github.com/jbeder/yaml-cpp.git # GIT_TAG <tag_name> # Can be a tag (yaml-cpp-x.x.x), a commit hash, or a branch name (master) ) FetchContent_GetProperties(yaml-cpp) if(NOT yaml-cpp_POPULATED) # 后面这段是其readme中写的, 其它库也不是不需要的 message(STATUS "Fetching yaml-cpp...") FetchContent_Populate(yaml-cpp) add_subdirectory(${yaml-cpp_SOURCE_DIR} ${yaml-cpp_BINARY_DIR}) endif() add_executable(main main.cpp) target_link_libraries(main yaml-cpp::yaml-cpp) # 注意这里连接的静态库的名字,是由19行的add_subdirectory中,yaml-cpp源码中的CMakeListst.txt中决定的,去看就明白了。 file(COPY ${CMAKE_CURRENT_SOURCE_DIR}/coco.yaml DESTINATION ${CMAKE_CURRENT_BINARY_DIR}/) file(COPY ${YAML_CPP_DIR}/bin/yaml-cppd.dll DESTINATION ${CMAKE_CURRENT_BINARY_DIR}/) # 不添加环境变量的话,就要把动态库复制过去 -
main.cpp
#include <iostream> #include <yaml-cpp/yaml.h> /* yaml-cpp中: Null 空节点 Sequence 对应YAML格式中的数组 Map 对应YAML格式中的对象 Scalar 对应YAML格式中的常量 下面只是读取,更多的修改,创建yaml文件,可参考:https://blog.csdn.net/u011775793/article/details/134714437 */ void read_coco_yaml() { YAML::Node config = YAML::LoadFile("C:\\Users\\Administrator\\Documents\\my_files\\coco.yaml"); // 获取指定路径下的值 // 一级下的 string std::string path = config["path"].as<std::string>(); std::cout << "path: " << path << std::endl; // 方式一:处理成map,一级下的string["names"]下的多级数据(这种是数据的key类型一致、value类型一致才行) // 所以用下面的 void sdg_yaml() 中的写法,将其再处理成 YAML::Node 格式 std::map<int, std::string> names = config["names"].as<std::map<int, std::string>>(); std::cout << "names: " << std::endl; for (const auto& node : names) { std::cout << node.first << ": " << node.second << std::endl; } // 方式二:直接遍历YAML节点 for (const auto& node : config["names"]) { std::cout << node.first << ": " << node.second << std::endl; } // 方式三:直接通过二级key拿到指定的值(1是二级索引的key) std::cout << config["names"][1] << std::endl; // 能直接打印出来 bicycle std::cout << typeid(config["names"][1]).name() << std::endl; // 但类型还是class YAML::Node // 所以要这么处理 (这两种方式都是一样的结果,为了保持同一,用第一种吧) std::string cate_name01 = config["names"][1].as<std::string>(); std::string cate_name02 = config["names"][1].Scalar(); // 仅结果为string时才能这么用 } void sdg_yaml() { YAML::Node config = YAML::LoadFile("C:\\Users\\Administrator\\Documents\\my_files\\default_config.yaml"); int save_days = config["SAVE_DAYS"].as<int>(); std::string url = config["URL"].as<std::string>(); // 工具台 YAML::Node cfg = config["V02"]; // 注意写法 std::string rtsp = cfg["rtsp"].as<std::string>(); std::string weights = cfg["weights"].as<std::string>(); std::string yaml = cfg["yaml"].as<std::string>(); bool post = cfg["post"].as<bool>(); std::vector<int> oriSize = cfg["oriSize"].as<std::vector<int> >(); // yaml中是 oriSize: [1280, 1024] int deviceId = cfg["deviceId"].as<int>(); float conf = cfg["conf"].as<float>(); float nms = cfg["nms"].as<float>(); int stride = cfg["stride"].as<int>(); } int main() { read_coco_yaml(); sdg_yaml(); return 0; }- default_config.yaml像这样:(注意啊给的字符串这些都不要加引号)
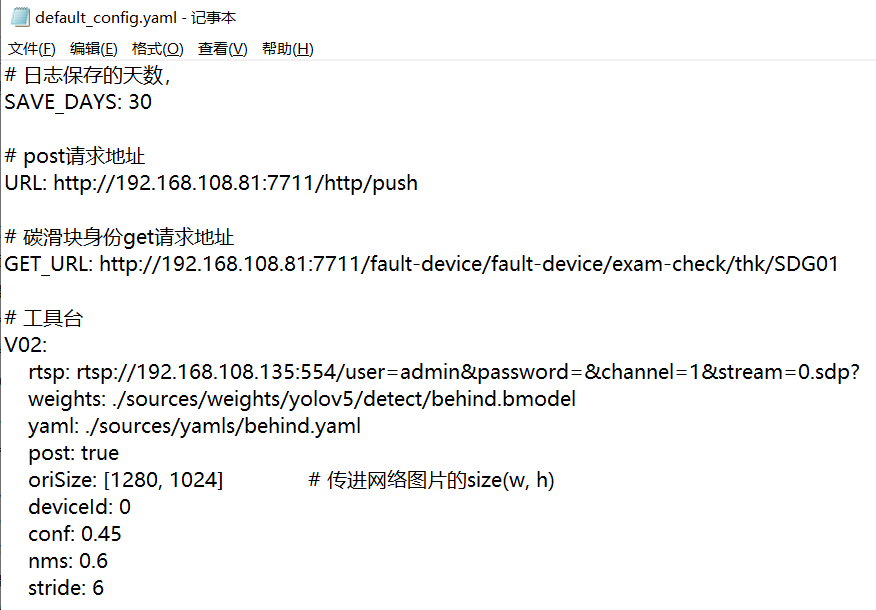
- default_config.yaml像这样:(注意啊给的字符串这些都不要加引号)